Achieve Steakhouse Perfection: Sear & Roast for Juicy Steaks at Home
Imagine sinking your teeth into a perfectly cooked, tender, and incredibly juicy steak, complete with a beautifully caramelized crust. For many, this is a luxury reserved for a special night out at a high-end steakhouse. But what if you could replicate that sublime experience in your own kitchen, consistently, and without the exorbitant price tag or the need to get all dressed up? The good news is, you absolutely can. Mastering the art of making a true
steakhouse steak at home is not as daunting as it seems. With the right technique – specifically the sear and roast method – you're just minutes away from culinary triumph.
This method, popularized by culinary icons like Ina Garten, is a game-changer for home cooks. It ensures your steaks develop that irresistible crispy, peppery exterior while remaining incredibly tender and succulent on the inside. Gone are the days of overcooked, dry meat or steaks that lack that restaurant-quality finish. Let's unlock the secrets to achieving steakhouse-level perfection, right in your own home.
The Secret to Steakhouse Perfection: Sear and Roast
The fundamental principle behind achieving a phenomenal
steakhouse steak lies in a two-step cooking process: searing at high heat, followed by a finish in the oven. This dual approach is what differentiates a good home-cooked steak from an extraordinary one, delivering superior results that are difficult to achieve with a single cooking method.
*
The Searing Stage: This initial step is all about creating that enviable, dark, flavorful crust on your steak. High heat facilitates the Maillard reaction – a complex chemical process that browns the surface of the meat, developing hundreds of new flavor compounds and a tantalizing aroma. Searing locks in the surface juices, ensuring a robust exterior texture.
*
The Roasting Stage: After achieving a magnificent sear, the steak is transferred to the oven. This is where the magic of even cooking happens. The ambient heat of the oven gently raises the internal temperature of the steak to your desired doneness, preventing the exterior from burning while allowing the interior to cook through uniformly. This gentle finish ensures a juicy, tender, edge-to-edge perfection that's the hallmark of any great
steakhouse steak.
This method is particularly effective for thicker cuts of meat, ensuring they cook through without drying out. It's a technique embraced by top chefs and easily reproducible in any home kitchen with standard equipment.
Selecting Your Prime Cut and Essential Prep
The journey to a perfect
steakhouse steak begins long before it hits the pan. Choosing the right cut and preparing it properly are critical steps often overlooked.
Choosing Your Steak
While the reference context highlights filet mignon, an excellent choice for its tenderness, the sear and roast method is versatile enough for several premium cuts.
*
Filet Mignon: Known for its exceptional tenderness and mild flavor. Its low fat content benefits greatly from the butter finish.
*
Ribeye: Prized for its rich marbling, which melts during cooking, infusing the meat with incredible flavor and juiciness. A thick-cut ribeye (1.5-2 inches) is ideal.
*
New York Strip: Offers a great balance of tenderness and robust beefy flavor, often with a nice fat cap on one side that renders beautifully.
*
Porterhouse/T-Bone: These cuts offer both a strip and a tenderloin, providing variety in a single steak, perfect for sharing.
Regardless of the cut, aim for steaks that are at least 1.5 inches thick. Thinner steaks cook too quickly to benefit fully from the sear and roast method, risking overcooking before a proper crust can form. Ask your butcher for high-quality, properly aged cuts; they are your best resource for selecting prime meats ready for exceptional flavor.
Pre-Cooking Preparation
Proper preparation can make all the difference in achieving that professional finish:
- Bring to Room Temperature: Remove your steaks from the refrigerator about 30-60 minutes before cooking. This allows the meat to warm up slightly, promoting more even cooking from edge to center. A cold steak hitting a hot pan can result in an overcooked exterior and a cool, undercooked interior.
- Pat Dry, Thoroughly: This is arguably one of the most crucial steps. Moisture on the surface of the steak is the enemy of a good sear. Use paper towels to pat the filets dry on all sides until no moisture remains. A dry surface ensures searing, not steaming, creating that beautiful crust.
- Season Generously: Brush the steaks lightly all over with a high smoke point oil (like grapeseed, canola, or avocado oil). Then, combine coarse sea salt (such as fleur de sel, as recommended by Ina Garten, or Maldon) and freshly cracked black pepper on a plate. Roll the steaks in the mixture, pressing lightly to ensure an even, robust coating. This generous seasoning is key to developing that incredible crust and rich flavor reminiscent of a steakhouse steak.
Mastering the Sear: High Heat for a Golden Crust
The searing phase is where your
steakhouse steak truly begins to take shape. This step requires confidence, a hot pan, and proper ventilation.
1.
Preheat the Oven: Start by preheating your oven to a robust 400°F (200°C). This ensures it's ready the moment your seared steaks need to go in.
2.
Heat Your Skillet: A heavy-bottomed, oven-safe pan is non-negotiable, and a cast-iron skillet is the undisputed champion here. Place your large cast-iron skillet over high heat for 5 to 7 minutes. You want it screaming hot – almost smoking – to create that immediate, deep crust.
3.
Sear the Steaks: When the pan is extremely hot (a few drops of water should evaporate instantly), carefully add your seasoned steaks. Ensure you don't overcrowd the pan; cook in batches if necessary to maintain high heat. Sear evenly on all sides – top, bottom, and especially the narrower edges – for about 2 minutes per side. For thicker cuts, use tongs to hold the steak on its sides to get a complete sear all around. You'll likely need about 3 turns to sear all surfaces, totaling around 10 minutes. This aggressive searing builds the foundation of flavor and texture. Remember to ensure your cooking area is well-ventilated, as there will be smoke. For more detailed instructions on this initial searing step, you might find valuable insights in this guide:
Cook Ina Garten's Restaurant Steakhouse Steaks Easily.
Finishing in the Oven: Achieving Your Desired Doneness
Once your steaks boast a beautiful, dark crust, it's time to transfer them to the oven to finish cooking to your preferred doneness.
1.
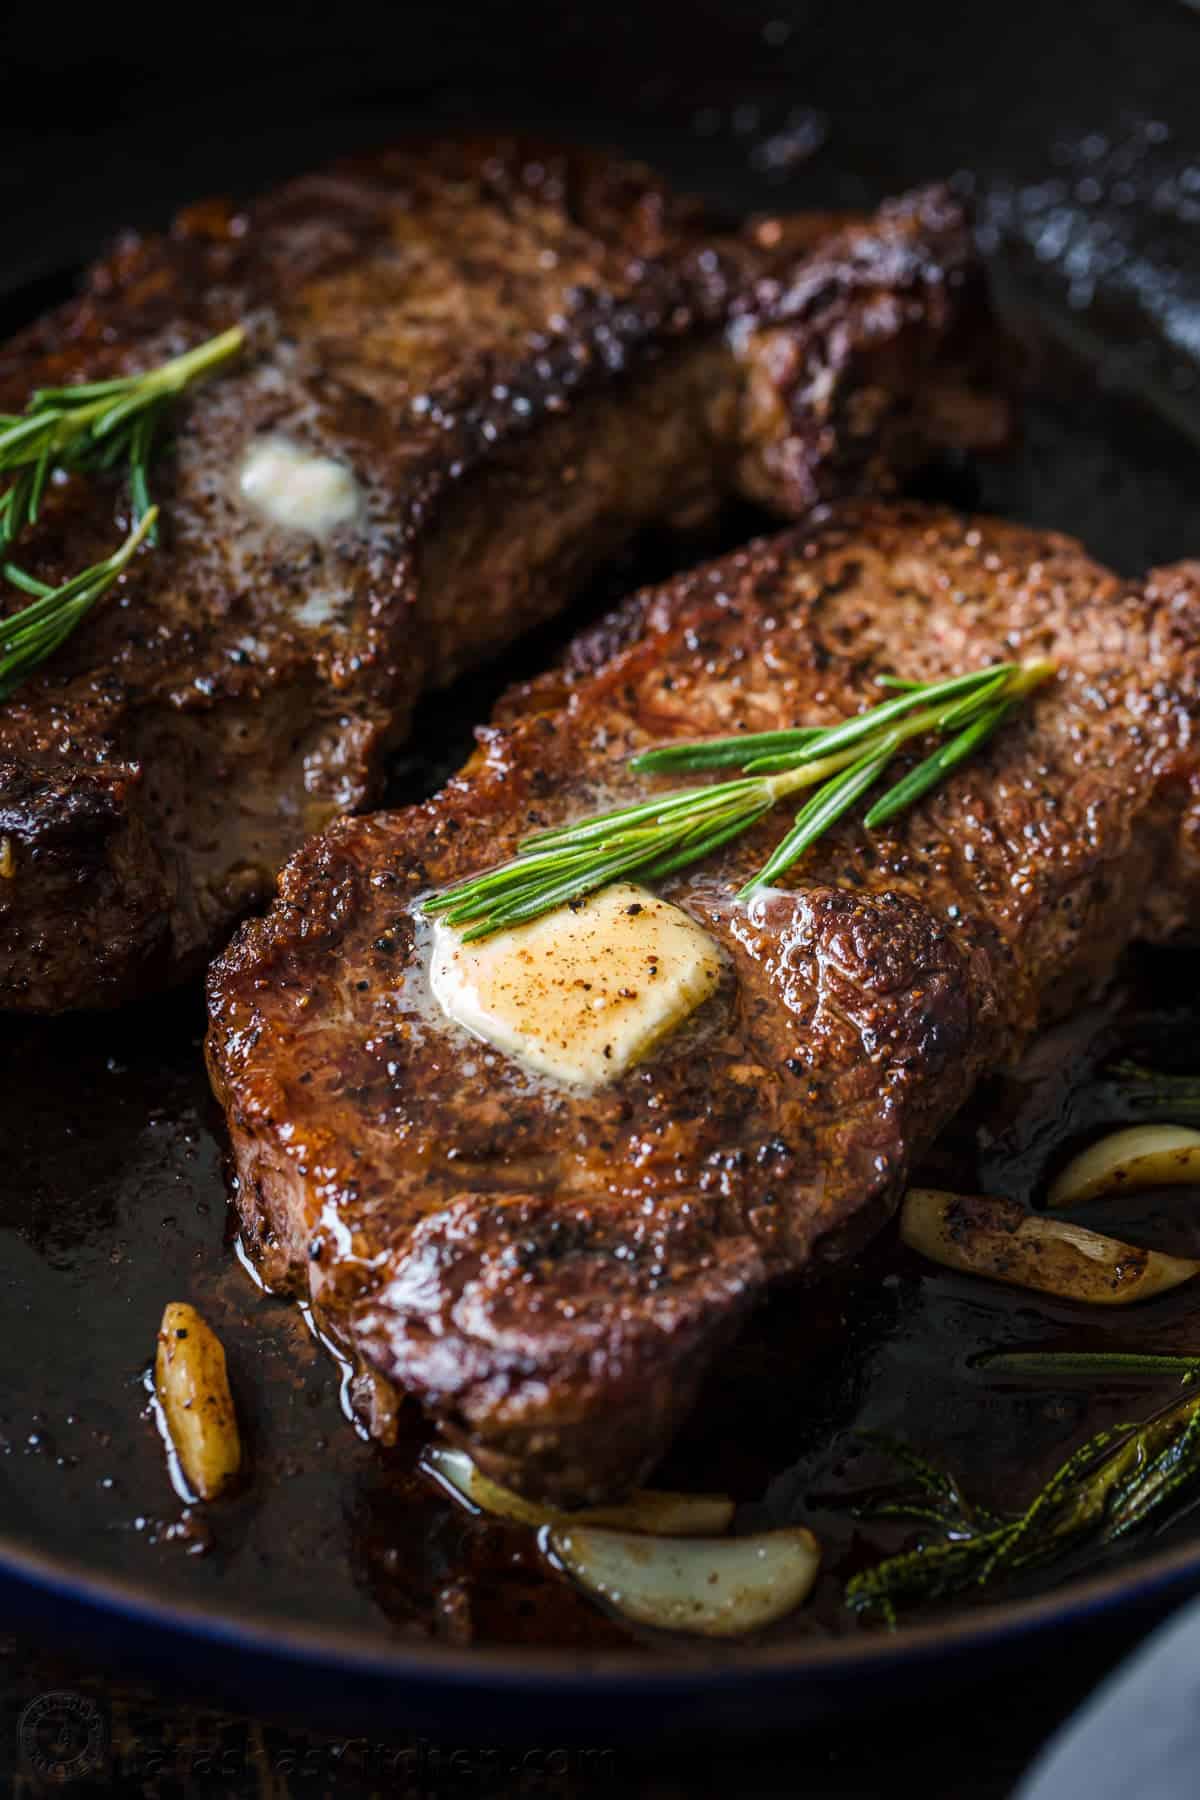
Add Butter and Herbs: Remove the pan from the heat. Arrange all the steaks flat in the pan. Top each with a generous tablespoon of unsalted butter. For an added layer of aroma and flavor, consider tucking a sprig of fresh rosemary or thyme and a crushed garlic clove around the steaks in the butter.
2.
Oven Roasting: Carefully place the hot pan, with the steaks, into the preheated 400°F (200°C) oven. Cook for 8 to 12 minutes, depending on the thickness of your steaks and your desired doneness.
3.
Monitor Doneness with a Thermometer: The only foolproof way to achieve perfect doneness is by using an instant-read meat thermometer. Insert it into the thickest part of the steak, away from any bone.
*
Rare: 120-125°F (49-52°C)
*
Medium-Rare: 125-130°F (52-54°C)
*
Medium: 130-135°F (54-57°C)
*
Medium-Well: 140-145°F (60-63°C)
*
Well-Done: 150°F+ (65°C+)
*
Note: The internal temperature will rise another 5-10 degrees during resting. Remove steaks when they are 5 degrees below your target temperature.
For more tips on ensuring your steak is cooked perfectly every time, check out this comprehensive guide:
Skip the Steakhouse: Perfect Steak at Home, Every Time.
The Non-Negotiable Rest: Unlocking Ultimate Juiciness
This final step is perhaps the most critical for a truly juicy
steakhouse steak, and it's where many home cooks falter. Resist the urge to cut into your steak immediately after it comes out of the oven!
1.
Transfer and Cover: Remove the steaks from the pan (to prevent them from continuing to cook in residual heat) and place them on a warm platter or cutting board. Cover them tightly with aluminum foil to create a tent.
2.
Allow to Rest: Let the steaks rest for at least 5 to 10 minutes. For larger, thicker cuts, 10-15 minutes is even better.
Why Resting is So Important
When meat is cooked, the muscle fibers contract, pushing the juices to the exterior of the steak. If you cut into it immediately, all those precious juices will flood onto your plate, leaving you with a dry, less flavorful piece of meat. Resting allows the muscle fibers to relax and the juices to redistribute evenly throughout the steak. This results in every bite being tender, moist, and bursting with flavor. Patience truly is a virtue when it comes to a perfect
steakhouse steak.
Beyond the Basics: Tips for an Elevated Experience
To truly elevate your homemade
steakhouse steak, consider these additional tips:
- Compound Butters: Experiment with making your own flavored butters (e.g., garlic-herb butter, blue cheese butter) to top the resting steaks for an extra layer of richness.
- Sauces: While the steak is fantastic on its own, a simple pan sauce made from the rendered butter and drippings, or a classic Roquefort Chive Sauce (as inspired by the references), can take it to the next level.
- Perfect Pairings: A steakhouse steak pairs wonderfully with almost any side. Consider roasted asparagus, creamed spinach, garlic mashed potatoes, crispy shoestring fries, or a fresh garden salad for a complete restaurant-quality meal.
- Don't Overcrowd: We can't stress this enough. If your pan isn't large enough for all steaks to have ample space, cook them in batches. Overcrowding lowers the pan temperature, leading to steaming instead of searing.
There's no need to spend copious amounts of money or get all dressed up to enjoy a high-quality, perfectly prepared steak. With the sear and roast method, a little practice, and these detailed steps, you can confidently bring the luxury of a
steakhouse steak experience directly to your dining table. So, grab your cast iron, choose your favorite cut, and prepare to impress yourself and your guests with a truly unforgettable meal.